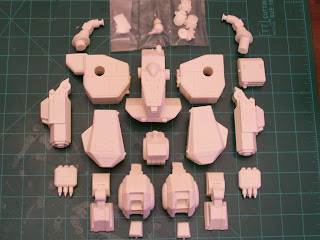
Before assembly, thoroughly clean all parts in warm water
with a mildly abrasive cleaner like Ajax, Softscrub or Comet. This will cleanse
any additional mold release and allow paints to adhere to the surface. Remove flash or over pour with a razor knife
or saw. Additionally, it is strongly
recommended that you test fit all pieces before final assembly.
 |
| Parts Layout |
This is how the torso goes together. The area noted needed to be sanded down to get it to fit properly.
Here is how the legs go together. The small hole in the knee is for the knee guard. The tab on the knee guard is 5/32". You will have to bore it out a bit. I don't like making those holes too deep as you run the risk of the rubber getting in there and tearing the mold.
 |
| Hip section |
 |
| Knee guards are pictured in the back right. |
I made a silly mistake on the arms. I sent two completely different arms to the caster. One has a tapered end (circled). The arm brackets on this one will have to be sanded down slightly for them to fit on the end of the arm.
 |
| Sand down these parts to fit on the goofy arm. |
The pictures below are some of the torso detail pieces. Specifically, the antenna for the center torso, the anti-personnel machine gun for the recess in the left torso and the search light for the right torso.
One final observation is that there are more bubbles in these castings than I would like. Some are in areas that will be hidden when assembled. On my copy there are some ugly bubbles at the top of the leg.
One final note. The mounting side of the anti-personnel rockets need to be sanded down a bit. If you don't then the rockets will make contact with the arms.
Enjoy your Hellbringer kit!


No comments:
Post a Comment